Manual configuration of a mailbox on Exchange 2013 is not advised, but is possible. Please pay close attention to the settings below to ensure you have success.
Finding your GUID
From Exchange 2013 onward, each mailbox has its own GUID-based server name, and no longer uses a generic server name in Outlook.
It's important to note that each GUID server name will only work with the mailbox for which it's intended. This allows Exchange 2013 to maintain sessions without the need of an Outlook restart should a back-end server go offline for any reason.
There are two ways to view and check a mailbox's GUID.
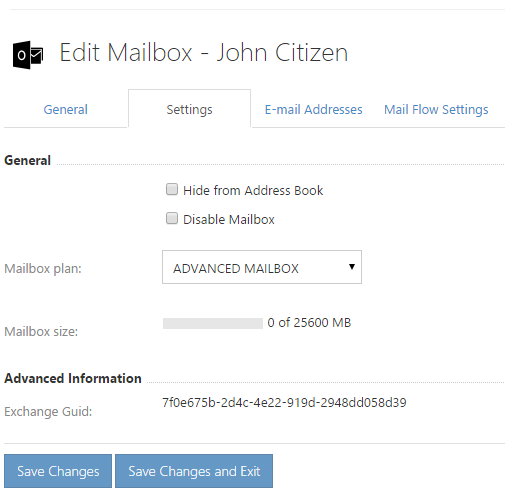
The simplest way is via the control panel.
Click into your Hosted Organisation, then navigate to Mailboxes.
Click into a mailbox, and on the default Settings tab, you'll see the following:

To form your specific mailbox server name, take the GUID and add your primary domain name to it, like this:
1204aa1a-22ad-4bf5-8800-ffbe02b8c8c2@yourdomain.com.au
Be sure to note the @ in between the GUID and your primary domain.
Manual Configuration Steps
- In the Windows Control Panel, click on the Mail icon to open your Outlook settings.
- Click on Show profiles
- Click on Add
- Enter a name in the Profile name field, then click OK
- Click on Manually configure server settings or additional server types, then click Next
- Click on "Microsoft Exchange or compatible service", then click Next
- Enter guid@yourdomain.com.au eg, 1204aa1a-22ad-4bf5-8800-ffbe02b8c8c2@yourdomain.com.au in the Microsoft Exchange Server field
- Check the box to "Use Cached Exchange Mode" and choose the amount of data you want to cache. Bear in mind, we do not support any service where this setting is disabled.
- Enter your email address in the field User Name, but DO NOT click "Check Name"
- Click More Settings
- Select the Connection tab, then check the box Connect to Microsoft Exchange using HTTP
- Click on Exchange Proxy Settings
- Enter mail.exchangeserver.net.au in the "Use this URL to connect to my proxy server for Exchange" field
- Tick "Connect using SSL only"
- Tick "Only connect to proxy servers that have this principal name in their certificate"
- Enter msstd:mail.exchangeserver.net.au in the server name field
- Tick the boxes for both "On fast networks ..." and "On slow networks ..."
- Change "Proxy Authentication Settings" from NTLM Authentication to Basic Authentication.
- Click Apply, then click OK
- Make sure your full email address is in the User Name field, then click, Check Name
- Enter your password in the Password field, then click on OK
- When Outlook has completed its processing, both the server and your username will now be underlined
- Click Next, then click Finish
- Close the Mail screen and open Outlook. When you are asked for your password, enter it in the password field
- A message box will now appear in the lower right of your screen stating that Microsoft Outlook is setting up a local copy of your mailbox.
- It may be several minutes until all of your data is available. Once you see All folders are up to date and Connected to Microsoft Exchange, you can begin using your new Exchange profile.


